
Adding an Email Account to Your Desktop App
Once you know the essential steps, you can add a new Email account using your business domain to a desktop app like a pro. With this guide, you will learn how to add your domain email to any compatible desktop client in just a few simple steps!
I design websites for small organizations and small businesses as a web developer. Most of my clients want one or more email accounts using the domain of their website, such as “myemail@mybusiness.com.” I do all this for the client as a part of the website development. So far, so good.
Once the email accounts are created, I send the account information to the client to access them how they prefer. This information includes the webmail URL they can use to send and receive the email. In most cases, though, the preference is to add the account(s) to their desktop email client, such as Outlook. This is where problems arise, and I receive calls for help configuring the setup on their desktop client.
So in this article, I wish to provide a Step-by-Step Guide to Adding a New Email Account to Your Desktop App. Here is what we will be covering:
- Custom domain email accounts versus Google, Outlook, and similar accounts
- Step-by-step addition of email account using Outlook
- Step-by-step addition of email account using Mailbird

View Video
You can view a video of the article for a more hands-on presentation.
Custom domain email accounts versus Google, Outlook, and similar accounts
I assume you are reading this article because your attempt to add an account to your desktop email app did not work automatically. Now you don’t know what to do. I would also assume the email account you are trying to add is not a Google, Outlook, or similar account.
Many desktop email apps are slanted toward common accounts such as Google. If your email uses your domain name, it is being served by a less common email server and may not fall smoothly into the protocol of your desktop app. This does not mean it will not work, though. but it will require some more advanced steps.
In the following examples, I will use the Outlook desktop app, a common app, and the Mailbird app, a less common app. These two examples should cover most issues you might encounter with the app you are using.
Adding A New Email Account Using Outlook
For this example, I use the free Outlook version on Windows 10 instead of the Microsoft Office version. With Outlook open, our first step is to look for the setup icon at the bottom of the left-side menu. This opens a menu on the right side from which we will select the first option, “Manage accounts.”
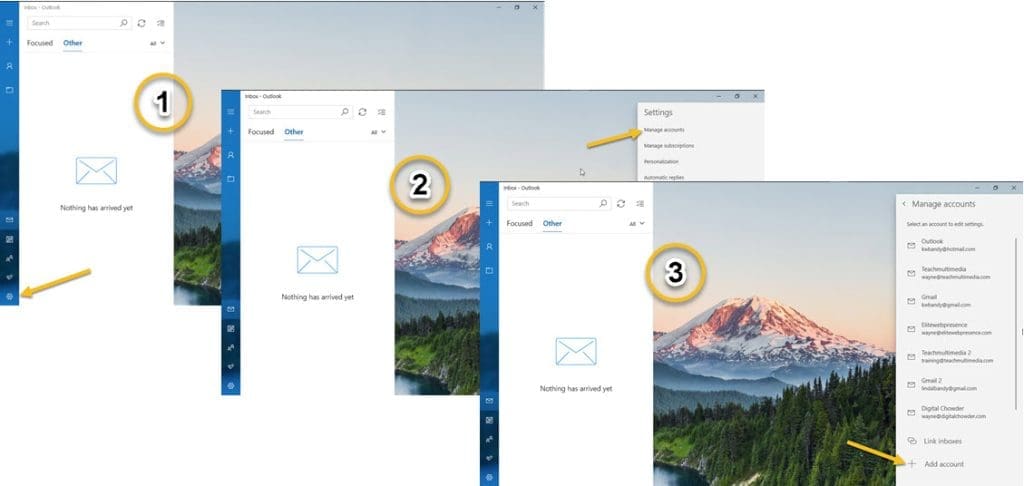
The “Manage accounts” option opens a list of email accounts already added to the app. At the bottom of the list, you will see “Add account.” Click on this, and you will be given several options to select how to add a new account. These include Outlook.com (live.com & MSN), Office 365, Google, Yahoo, and iCloud.
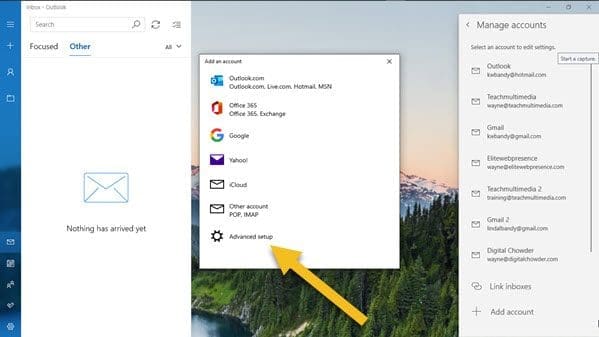
This list illustrates what I said about common apps being slanted toward standard email accounts. If the email account you want to add is not among these options, you have two remaining choices: Another account (POP, IMAP) and an Advanced setup. You can try the “Other account,” which will attempt to connect automatically. But if it does not connect, you have no other options. This leaves you feeling lost. So your remaining option is to use the “Advance setup” option.
Advanced Setup: You will need additional information to complete the advanced setup. If you use a custom domain-based email created by someone else, you must have them send you this information.
If you have built your website and have access to the dashboard of your website hosting service, log onto the dashboard and go to the email settings. From this page, you are looking for “Email server settings.”
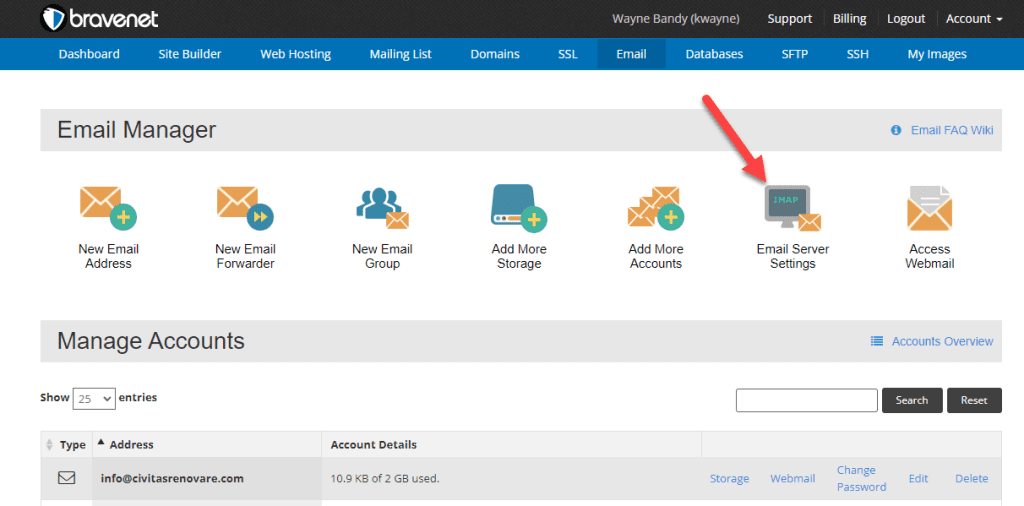
Your hosting dashboard will look different. This is only an example. Go to the email account if you do not have a specific server settings button. Look for three dots to the right of the listing. Click the dots to reveal a menu that should include server settings. Here is the information you will be given (your server & ports will be different):
| Incoming Mail Settings Email Protocol: IMAP IMAP Server: mail.bravehost.com (yours will be different) IMAP Port: 143 Connection Security: TLS/StartTLS Username: The email address you are working with is always the username. Password: The password for this specific email account. Authentication Type: Password | Outgoing Mail Settings SMTP server: mail.bravehost.com SMTP port: 587 Connection Security: TLS/StartTLS Username: The email address you are sending from (probably the same email used for incoming mail.) Password: The password for this specific email account. |
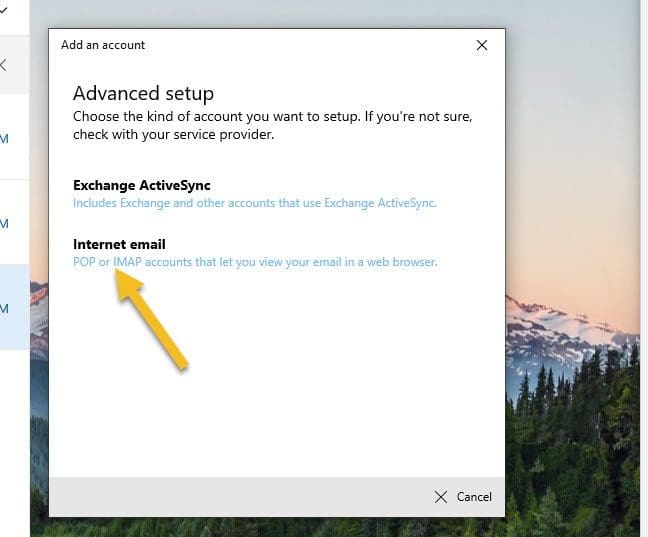
With this information, you can click the “Advanced setup” button. Your next choice is to select “Exchange ActiveSync” or “Internet email.” Choose “Internet email.”
On the next screen, you will begin to enter your information. First, enter your email address. Next, it asks for your User name. This can be confusing since the user name for most email accounts is the email address. So if you are unaware of a different user name, enter the email address. Enter the password next, followed by the account name. Again, this could be confusing. Unless you have a specific name for the account, enter the name you want as a label for this account in your app.
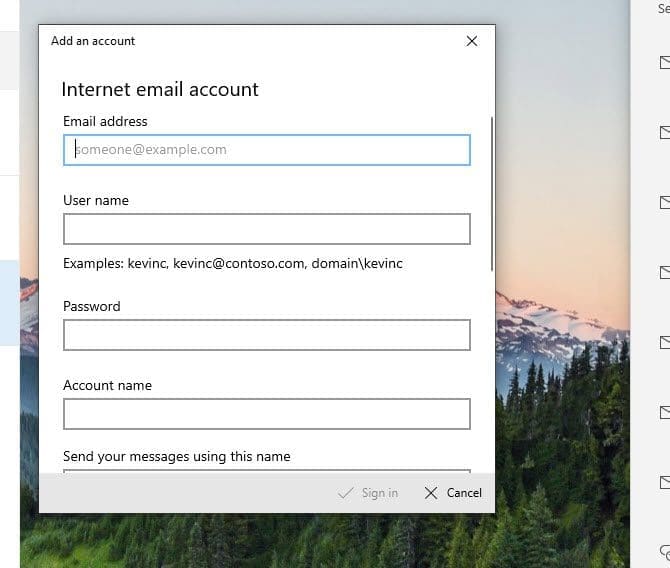
Then it asks for the name you want to use for sending messages. You can use the name you choose. There is no specified name. Label it with the name you want to identify to recipients of your email.
The following box asks for the “Incoming email server.” This should be in the data you gathered for this account setup. Be sure to notice there is both an incoming and an outgoing server. The server name for both may be the same or may not.
IMAP vs POP: Account type is next. The choices are POP3 OR IMAP4. What is the difference? POP3 leaves your email on the server while downloading new mail to your computer. Once you have the account in your app, you can go into account settings to check the frequency you want it to delete old mail from the server.
In my opinion, IMAP4 is a cleaner choice. IMAP syncs the email between the server and your computer, so both sources have identical mail. To keep your mail clean, you only need to do it on your computer. The server will sync to your computer and vice versa.
You are asked to enter the outgoing server after choosing your account type. As mentioned above, the outgoing server may or may not be the same as the incoming server. The information you glean from your host dashboard will show what this should be.
After you have followed these steps, four selections remain:
- Outgoing server requires authentication
- Use the same username and password for sending email.
- Require SSL for incoming email
- Require SSL for outgoing email
All four selections will probably be checked by default. Unless you know otherwise, you should leave them checked.
Now you are ready to click on “Sign In.” Hopefully, all will go well, and the account setup will complete successfully. But what happens if it does not set up successfully? Never fear. You still have options.
By choosing the advanced setup option, an account will be set up whether or not all the information you enter is correct. This allows you to return to the newly created account to edit information. All other choices you make will fail to create a new account if a connection is not made. This does not allow you to review the information to check why a connection was not made.
Follow Up On New Email Account: Using the advanced setup option, a new email account is created regardless of whether a connection was successfully made. You may not be given a message about whether or not the connection was made. So you will need to check out the new account.
Go back to the left-side menu to your list of email accounts. Find the new account and click on it. Are any emails in the inbox? If not, run a test. Send a test email to another email account you may have, and send a test email from that email to this account.
You must edit the new account settings if no email is in the inbox and your test fails. You will follow the same steps as before. Click the gear icon at the bottom of the left-side menu and return to “Manage accounts” from that menu. Find the new account from the list of email accounts and click on it.
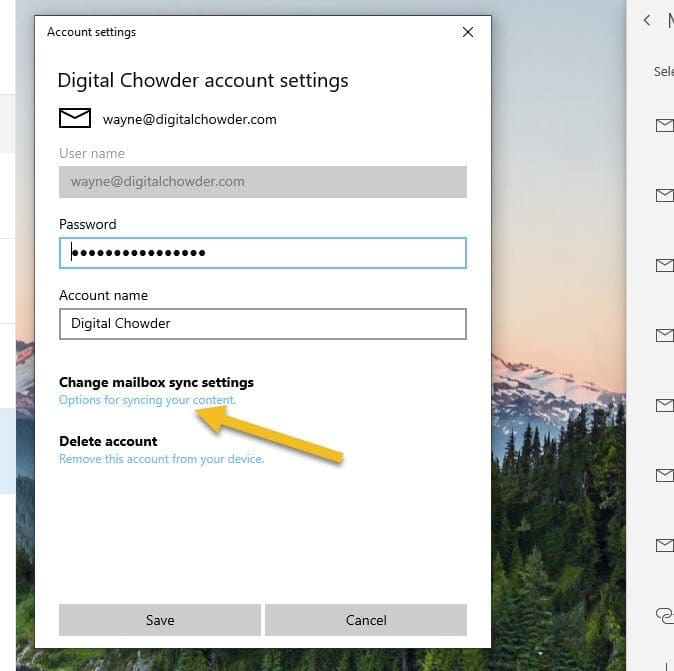
Go down to “Change mailbox sync settings.” You are not interested in the sync settings now, but the settings you need are in this section. There is only one thing on the following page you are interested in: “Advanced mailbox settings.” Click on this link.
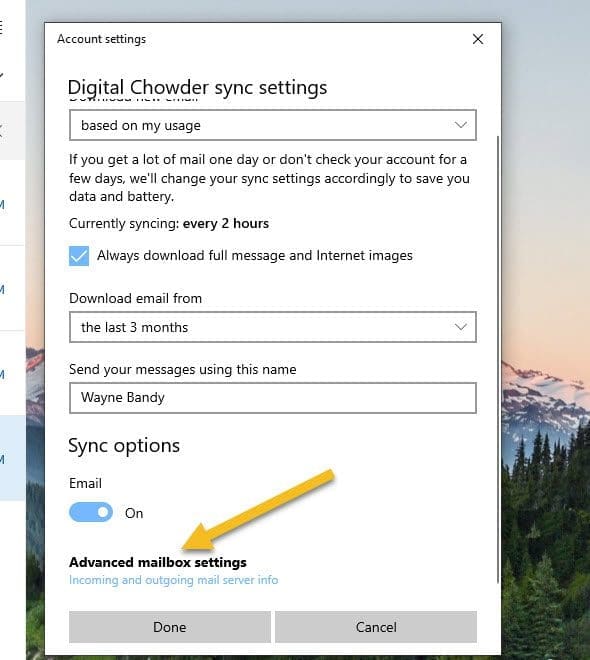
Now you can see the mail server settings and port numbers. In my case, the setting I found for the incoming email server is mail.bravehost.com:993:1. Is the first part (mail.bravehost.com) the correct incoming mail server setting? Is 993 the correct incoming port number? If you check back on the email settings listed above, you will see that the incoming port number should be 143. So this setting should be changed.
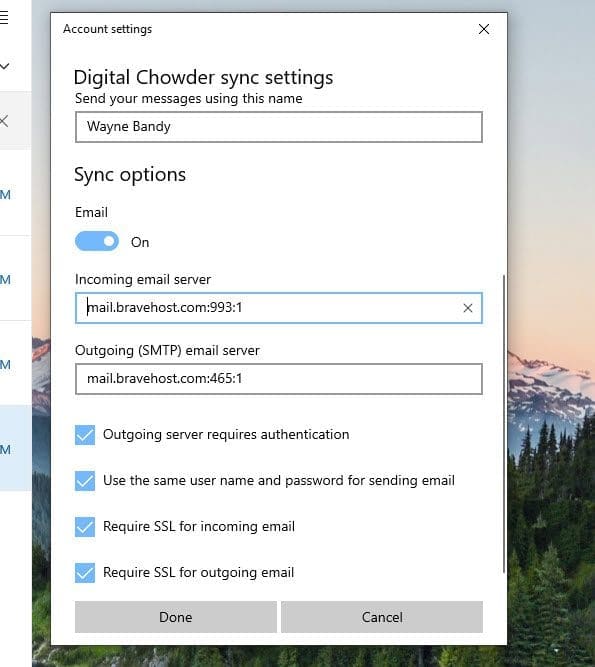
The outcoming email server settings I found are mail.bravehost.com:465.1. Again, the port number is incorrect. It should be 587. So this setting should also be changed. This is a common issue that is encountered. All the other settings may be correct, but the port numbers are incorrect.
Now that these settings have been corrected, I will click the “Done” button. Then I will click the “Save” button in the next window. After clicking “Save,” I got a link next to the account name saying “Fix account.” After clicking this link, I saw the password box was empty. It must have been automatically removed when I edited the server information. I entered the password and clicked save again. No messages appeared.
I went to the inbox for this new account, and since I found no mail in it, I sent a test email from another account. The test was successful.
Besides demonstrating what to do when a new email account is not created automatically, it also demonstrated some of the issues you may encounter in the setup process. In this instance, that included the port numbers being set incorrectly, and my password was removed.
Adding A New Email Account Using Thunderbird
For our next step-by-step demonstration, we will use Thunderbird.
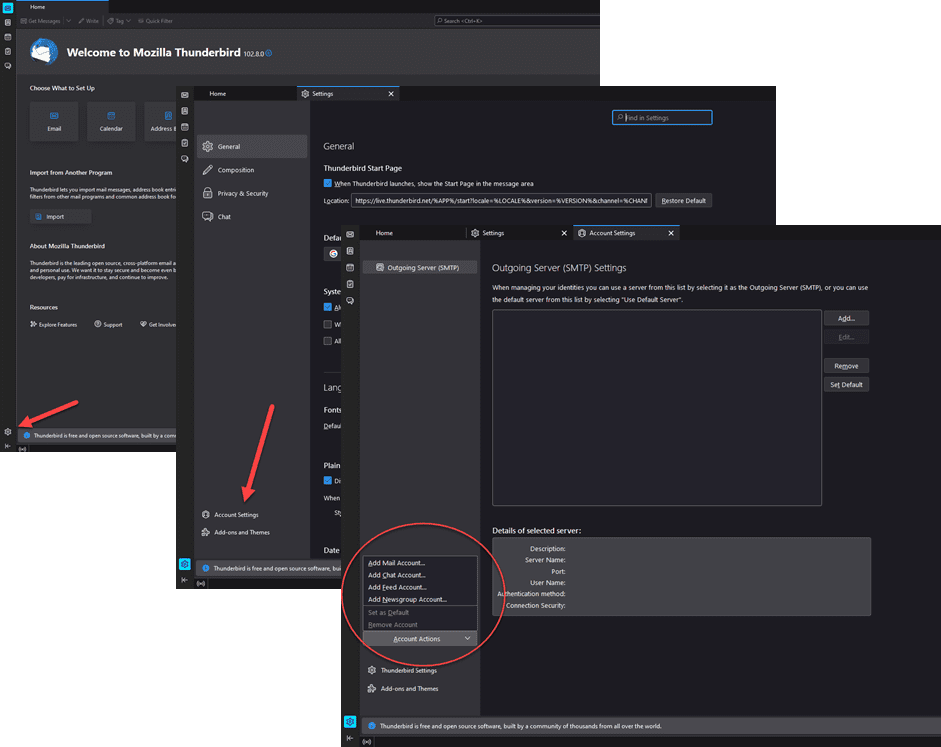
Look to the bottom of the left-side menu, where you will see the gear icon. Click on it to open a window with “Account settings.” Then look toward the bottom of the left-side menu for “Account Settings.” Look toward the bottom of the left-side menu for “Account Actions.” Click on the down arrow and select “Add Email Account.”
Under “Set Up Your Existing Email Address,” enter the Email address you are adding along with the password in the appropriate boxes. Now you will have two options, “Configure manually” and “Continue.” We will do both options for this demonstration so you can see what to expect.
If you prefer not to do the automatic configuration, skip to “Manual Configuration” below.
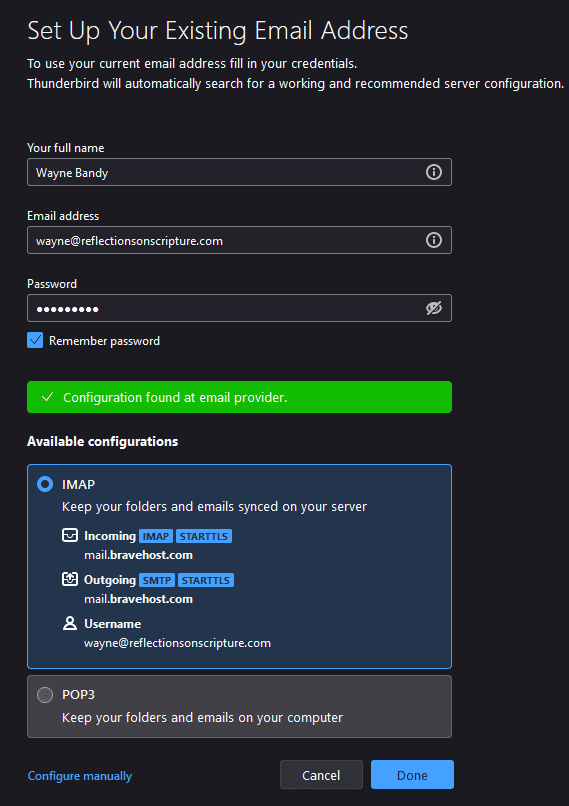
Automatic Configuration: So I will first select “Continue.” In the next window, Thunderbird will look for the Email account using the address and password you entered. Then you will see the results. By default, it shows the IMAP settings it found. Compare this information with the information you have from your email server. If all is correct, you can click “Done,” and you are ready. If any information is incorrect, click “Configure manually” and complete the setup.
You can also choose to use POP3 instead of IMAP if you prefer. If so, you will also need to check that the information is correct and click “Done” if it is or “Configure manually” if not. My information is correct, so that I will click “Done,” and this demonstration stage is completed.
I will remove my email setup and repeat the process by selecting “Configure manually” for this setup.
Incomplete Setup: If you have followed the instructions to this point, found that the server information was correct, and clicked “Done,” but it did not complete successfully for some reason, you may have an incomplete setup in which the Email account was added, but does not connect to the online Email server. In this case, you will need to follow these instructions.
Starting from the “Inbox” page, click on the gear icon at the bottom of the left-side menu, which will take you to “Setting.” Then click “Account Settings” toward the bottom of the left-side menu. You will find the Email account you just created listed on the “Account Settings” page. (As in the first Thunderbird step)
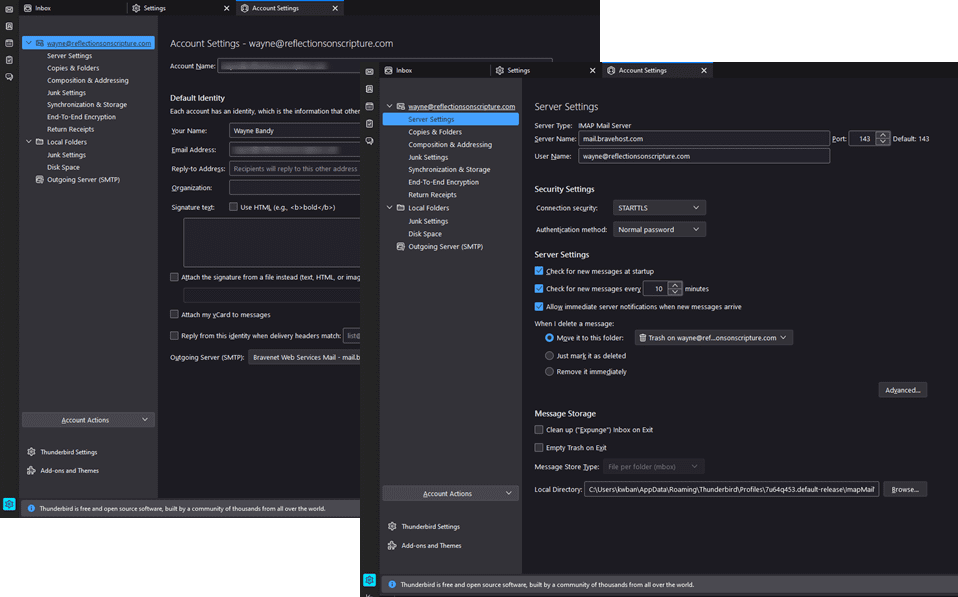
Click on the Email address to see information for the default identity. Check that the Email address is correct. Go to the bottom of the page to “Outgoing Server (SMTP). To the right, you will see the button “Edit SMTP Server.” Click the button, and you can edit Outgoing server information to coincide with the information you have from your online server. This will include:
- Server Name –
- Port number –
- Connection security – STARTTLS is the typical setting.
- Authentication method – Normal password is the typical setting.
Server Settings: Next, click “Server Settings” in the left-side menu under the Email address for the account. The Server Type will show the option you selected in the initial setup steps. If it shows IMAP and you prefer POP, or vice versa, you must remove the account and start over, following the steps below in “Manual Configuration.”
If the Server Type is correct, check that the Server Name and Port number are correct. The User Name should be the Email address for this account. Connection security and Authentication method will be the same as those you selected for the Outgoing server.
Connection security and Authentication method will be the same as the settings you entered for the Outgoing server.
The remaining server settings are unrelated to the connection with your online Email server. These settings configure the behavior of your Email app.
Manual Configuration:
You will follow the same steps you followed in the first steps using Thunderbird. So, from the “Inbox” page, go to the gear icon at the bottom of the left-side menu. Click the icon, which will open the “Settings” page. Now, go to the bottom of the left-side menu and click “Account Settings.” Then click the down arrow for “Account Actions” and select “Add mail account.” This opens the “Account Setup” page. Next, click on “Configure manually.”
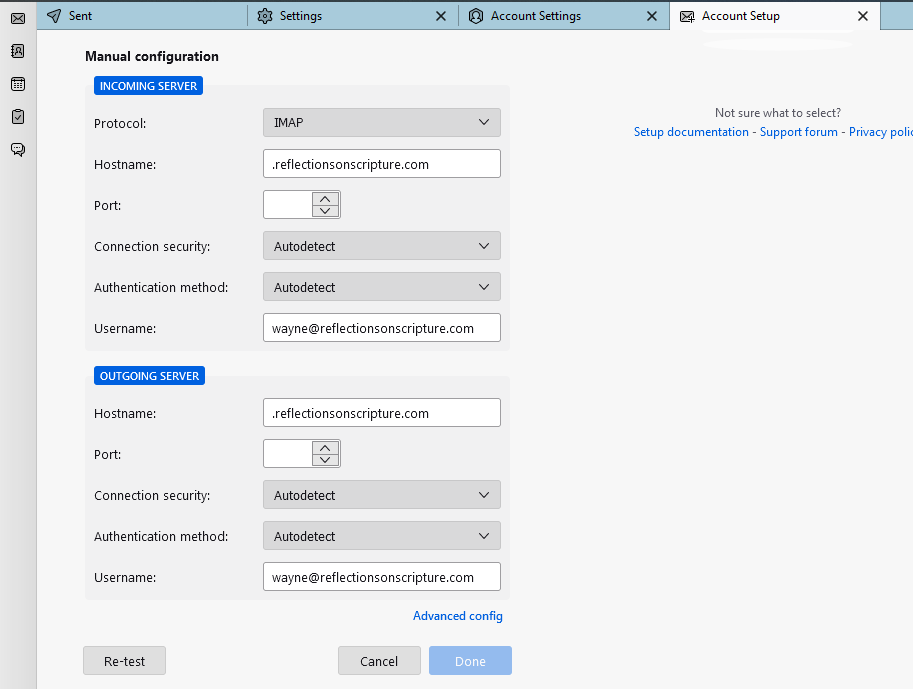
You are now on the “Account Setup” page. You will see the Email address for the account you are adding and the password you entered. Then you are shown manual configuration settings for “Incoming Server,” and “Outgoing Server.”
Incoming Server:
- Choose Protocol – IMAP or POP (For an explanation of IMAP and POP, go to “IMAP vs. POP” above)
- Hostname – Thunderbird will automatically fill this using the Email address you are adding. Your online server may use that protocol with something like “mail” as a prefix. Many do not, though. Check the information you have from your online server.
- Port – Enter the port number given by your online server.
- Connection security – autodetect should work.
- Authentication method – autodetect should work here also.
- Username – This is your Email address.
Outgoing Server:
The Hostname may be different from the Incoming server. Check your online server information. The Port number will be different than the Incoming server. Check your information. The remaining information can be left as is.
Click “Re-test” to see if these settings work. If so, you can click “Done,” and your account is ready to go. If not, double-check all your server settings for typos or other errors. Sometimes an app will change port numbers after you have entered them.
Conclusion:
Regardless of the desktop email app you are using, all of the above information must be correct. If the app cannot supply this information automatically, you must use whatever option you have available to enter the information manually. The main purpose of this demonstration is to show you how to find and use that option and what to do when you find it.
Entering server information manually may seem rather daunting when first confronted with it. But by following the steps shown in this demonstration, you should be able to do it like a pro.
If you follow these steps to add a new email account and are still unsuccessful, please ask questions in the comment section below. Let me know if you found any guidelines confusing or hard to understand.