Part 1 – The Best Features in Nicepage
Introduction
Hello, and welcome to the Digital Chowder blog. I’m Wayne, and this is the first of four posts and videos I will be doing about All the Best Features of Nicepage, my favorite website builder. This post will not be a how-to about how to use Nicepage. Nor will it be a review comparing Nicepage alongside other web builders. Instead, I will highlight some of my favorite features found in Nicepage.
This first post/video will address the Nicepage subscription plan, why I like it, and why it is a good fit for me. Then I will touch on the desktop app with Nicepage, giving an overview. Finally, I will discuss the options for publishing your website after designing it in the desktop app.

Nicepage Subscription Plans:
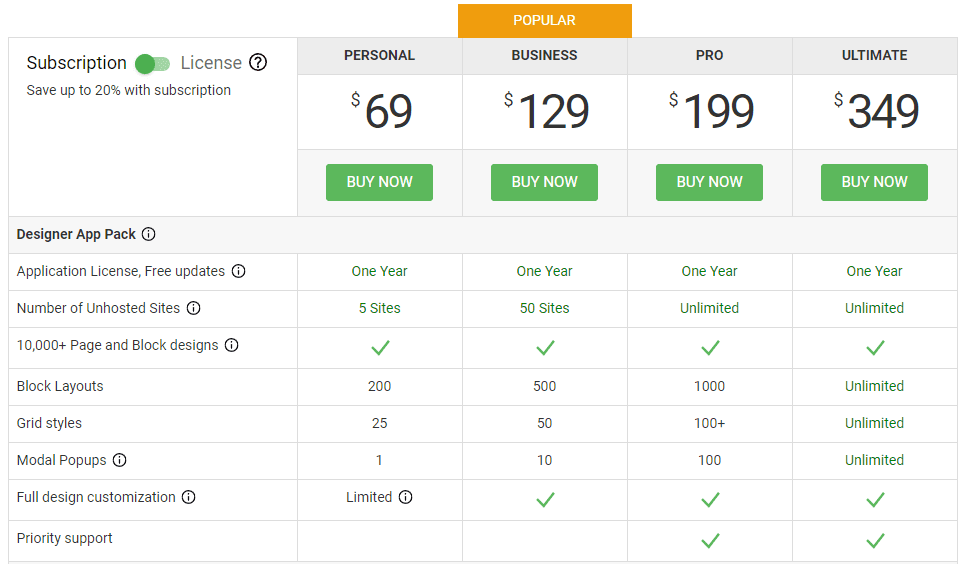
If you go to the Nice Page website and then to their premium page, you will see four subscription plans outlined. Each plan has two options: a subscription and a license. So what is the difference? With the license, you’re paying a one-time fee to purchase the software; with that, you’re getting one year of updates for the software. But beyond the first year, there will be an additional fee if you want any updates. I have chosen the subscription approach. With the subscription, you pay an annual fee and receive the software and all updates during the year. And it is ongoing.
When I started with Nice Page, I used the Personal plan since I only needed one website for my business plus a personal site. With the Personal plan, I could have as many as five websites. So that was quite adequate. But now I design websites for other businesses besides my own. So I need to use Nicepage for more than five websites. However, I don’t need an unlimited number of sites.

So, let’s jump over to the Elementor website and look at their plans to understand why the Nicepage subscription is a good fit for me. With Elementor, three plans start with the Essential plan, which is $59 a year. This plan allows you one website. If you jump to the Expert Plan, which is $199 a year, you are allowed 25 websites.
Now let’s go back to the Nicepage website. Back there, the Business plan offers a middle ground between the Personal and Pro plans, which Elementor does not have. The Business plan for $129 a year allows me 50 websites and additional features. This is just right for me. I need more than the Personal plan offers, but I don’t need all that the Pro plan provides. So the Business plan is the one I use. I would pay $199 annually at Elementor and only get 25 sites.

Desktop App:
The next feature I want to highlight is the desktop app with Nicepage. There is a desktop app for both Windows and Mac computers. If you’re building a WordPress website, you also get a WordPress plugin; if you’re doing a Joomla site, you get that one.
You can do the whole website on your computer before you import it to your WordPress website. But it is not required. Creating the site layout is the only portion of building a website that requires the desktop app. Once you have created a layout for your website, you can export the site to a zip file and install it as a WordPress theme. You can do the remainder of the design online. Or not! You can also build the complete site on your desktop before installing it online.
Once you have installed the design theme on your WordPress site, you can work back and forth between online and offline.
Once your site is online, you can edit it on the desktop or do it online, whichever you choose. I do both. I like to be able to do major edits on my desktop, knowing that when I do a save, it’s not going to go public.
Next, let’s look more closely at the desktop app.
You can check the video above to see what I’m talking about in the following comments.
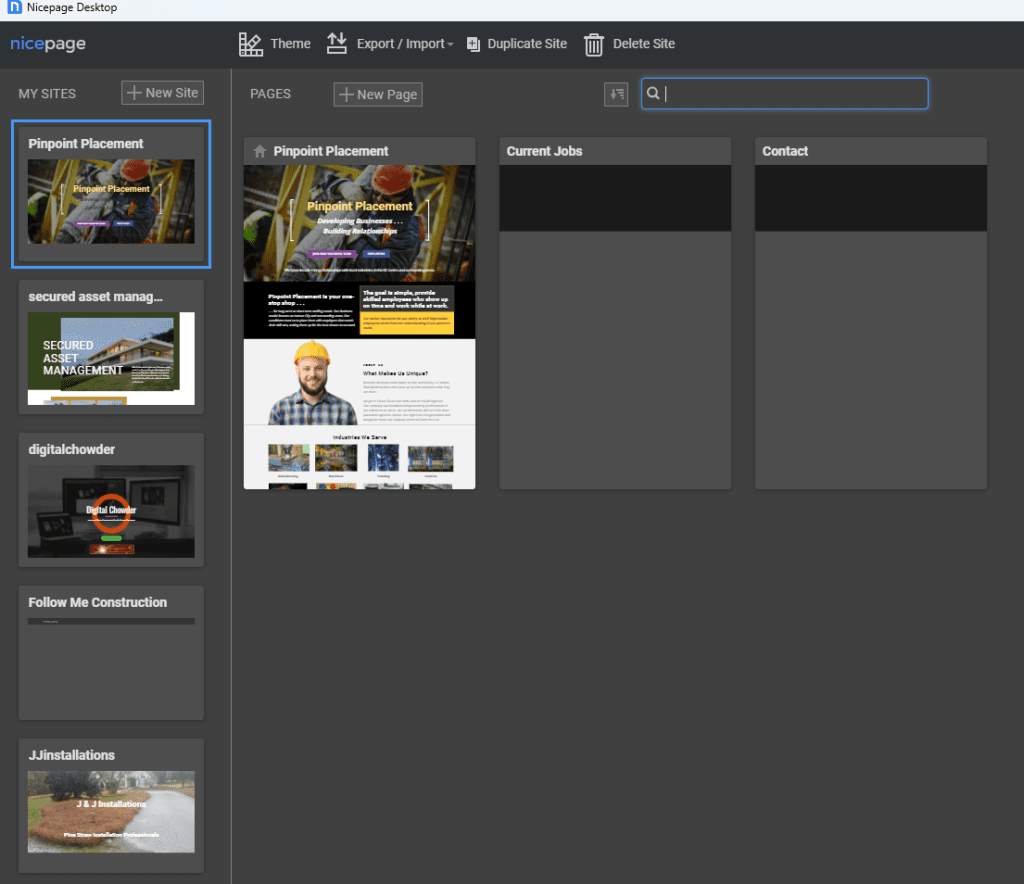
As you view the desktop application listed in the left-hand column, you will see a list of your websites. Click the appropriate icon to open the site you want to work with. You can also delete a website you are no longer working with from this page. To create a new website, use the “New Site” button.
If you are creating a new website, you can start with a blank website and build the site from scratch, adding elements as you go. Or, you can use your graphics to form the bases of the site. Yet another option is to select a design template from the various categories listed. Once you choose a template, you can stay close to the template design or use it only as a starting point.
Publishing The Website:
When you are ready to export my website to an online host, I can click the “Publish” button. You can publish a temporary Nicepage-hosted site, an HTML format, or a WordPress theme.
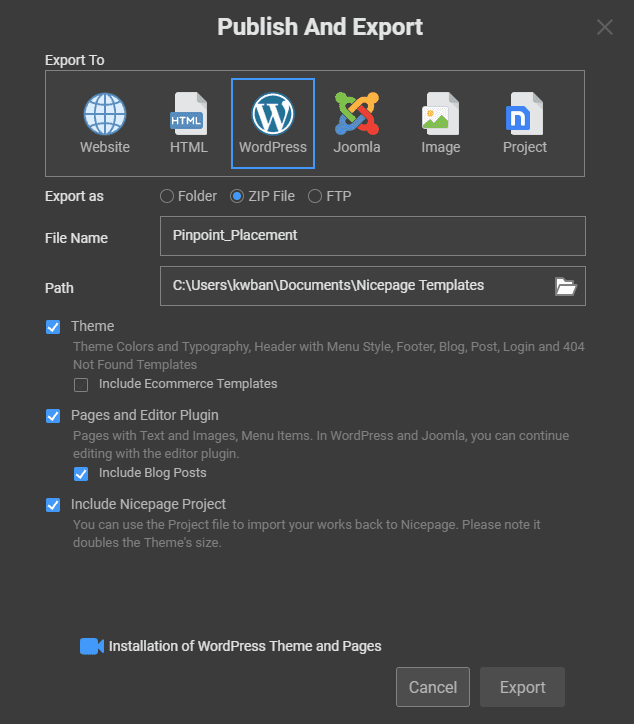
The temporary “Website” option is quick and easy. Press the publish button to install the site on the Nicepage server. Then share the subdomain with a client for their review of the site. There is no configuration or installation or uploads to do to have a site looking like the one on your desktop.
Another option is an HTML site. This choice requires an FTP app to upload to the host server.
If you publish a WordPress site, use the output zip file to install in WordPress as you do with any other theme.
Conclusion
In this post, I have given an overview of Nicepage. In the next post, I will detail some of my favorite design features in Nicepage. Meanwhile, I encourage you to get a free Nicepage download and try it. Then come back to the other posts for further help.
